Caffe [1] was (to the best of my knowledge) one of the earliest deep learning framework — originally developed by Yangqing Jia in late 2013. Still, Caffe is one of the most popular deep learning frameworks — inspite of many other deep learning frameworks such as Torch, Theano/Lasagne or Tensorflow. While the community is quite large and there exist many examples and tutorials, it may be hard to get started with Caffe, especially when using the Python interfance pyCaffe — at least it was for me. In this article, I share some of the tools and small examples for using pyCaffe for deep learning.
The discussed tools and examples, called caffe-tools, can be found on GitHub:
pyCaffe Tools and Examples on GitHubMar 16, 2017. The ManhattenLoss was updated thanks to the discussion in the comments.
Installation
Some time ago, I wrote a short article on installing CUDA and Caffe on Ubuntu. The article does not explicitly discuss the installation of pyCaffe, though, and some of the steps may not be up-to-date anymore. Therefore, I briefly discuss the installation of pyCaffe, assuming that CUDA is already ready.
In his StackOverflow answer, Franck Dernoncourt provides an excellent script, which can also be found in the provided GitHub repository (install_caffe.sh). The script takes care of installing the required dependencies (except for CUDA), downloads the latest Caffe and builds it:
# Set up here how many cores you want to use during the installation:
NUMBER_OF_CORES=2

cd
sudo apt-get update
sudo DEBIAN_FRONTEND=noninteractive apt-get upgrade -y -q -o Dpkg::Options::="--force-confdef" -o Dpkg::Options::="--force-confold" # If you are OK with all defaults

sudo apt-get install -y libprotobuf-dev libleveldb-dev libsnappy-dev libopencv-dev libhdf5-serial-dev
sudo apt-get install -y --no-install-recommends libboost-all-dev
sudo apt-get install -y libatlas-base-dev
sudo apt-get install -y python-dev
sudo apt-get install -y python-pip git

# For Ubuntu 14.04
sudo apt-get install -y libgflags-dev libgoogle-glog-dev liblmdb-dev protobuf-compiler

git clone https://github.com/LMDB/lmdb.git
cd lmdb/libraries/liblmdb
sudo make
sudo make install

# More pre-requisites
sudo apt-get install -y cmake unzip doxygen
sudo apt-get install -y protobuf-compiler
sudo apt-get install -y libffi-dev python-dev build-essential
sudo pip install lmdb
sudo pip install numpy
sudo apt-get install -y python-numpy
sudo apt-get install -y gfortran # required by scipy
sudo pip install scipy # required by scikit-image
sudo apt-get install -y python-scipy # in case pip failed
sudo apt-get install -y python-nose
sudo pip install scikit-image # to fix https://github.com/BVLC/caffe/issues/50

# Get caffe (http://caffe.berkeleyvision.org/installation.html#compilation)
cd
mkdir caffe
cd caffe
wget https://github.com/BVLC/caffe/archive/master.zip
unzip -o master.zip
cd caffe-master

# Prepare Python binding (pycaffe)
cd python
for req in $(cat requirements.txt); do sudo pip install $req; done
echo "export PYTHONPATH=$(pwd):$PYTHONPATH " >> ~/.bash_profile # to be able to call "import caffe" from Python after reboot
source ~/.bash_profile # Update shell
cd ..

# Compile caffe and pycaffe
cp Makefile.config.example Makefile.config
sed -i '8s/.*/CPU_ONLY := 1/' Makefile.config # Line 8: CPU only
sudo apt-get install -y libopenblas-dev
sed -i '33s/.*/BLAS := open/' Makefile.config # Line 33: to use OpenBLAS
# Note that if one day the Makefile.config changes and these line numbers change, we're screwed
# Maybe it would be best to simply append those changes at the end of Makefile.config
echo "export OPENBLAS_NUM_THREADS=($NUMBER_OF_CORES)" >> ~/.bash_profile
mkdir build
cd build
cmake ..
cd ..
make all -j$NUMBER_OF_CORES # 4 is the number of parallel threads for compilation: typically equal to number of physical cores
make pycaffe -j$NUMBER_OF_CORES
make test
make runtest
#make matcaffe
make distribute

# Bonus for other work with pycaffe
sudo pip install pydot
sudo apt-get install -y graphviz
sudo pip install scikit-learn
Note that for using custom Python layers, pyCaffe needs to be installed using the WITH_PYTHON_LAYER=1 option. Afterwards, Caffe needs to be added to the Python path. On Ubuntu this can be done by editing the .bashrc or .bash_profile. Note that the below paths need to be adapted to the installation directory of Caffe:
export OPENBLAS_NUM_THREADS=(4)
export CAFFE_ROOT=/home/david/caffe
export LD_LIBRARY_PATH=/usr/local/cuda/lib64:$LD_LIBRARY_PATH
export PYTHONPATH=/home/david/caffe/python:$PYTHONPATH
Note that, currently, Caffe only supports Python 2. When running into problems with pip and/or pip3 (e.g. if both correspond to a Python 3 installation), make sure to use python -m pip instead (not python3 -m pip!).
LMDB I/O and Pre-processing
One of the annoying parts when getting started with Caffe, is converting and correctly pre-processing the availabel data. Without writing custom data layers, Caffe uses LMDBs to read its input data. Datasets stored in LMDBs are particularly efficient to read and, therefore, preferrable for large datasets and deep learning. To this end, Caffe is based on the Python LMDB package.
Caffe expects the images (i.e. the dataset) to be stored as blob of size (N, C, H, W) with N being the dataset size, C the number of channels, H the height of the images and W the width of the images. Each image is associated with a unique key — which is usually an id with leading zeros. The images are either stored as unsigned chars (8 bit) or floats (32 bit). The following code illustrates how to write data to an LMDB:
import lmdb
import numpy
import caffe

def write(self, images, labels = []):
    """
    Write a single image or multiple images and the corresponding label(s).
    The imags are expected to be two-dimensional NumPy arrays with
    multiple channels (if applicable).

    :param images: input images as list of numpy.ndarray with height x width x channels
    :type images: [numpy.ndarray]
    :param labels: corresponding labels (if applicable) as list
    :type labels: [float]
    :return: list of keys corresponding to the written images
    :rtype: [string]
    """

    if len(labels) > 0:
        assert len(images) == len(labels)

    keys = []
    env = lmdb.open(self._lmdb_path, map_size = max(1099511627776, len(images)*images[0].nbytes))

    with env.begin(write = True) as transaction:
        for i in range(len(images)):
            datum = caffe.proto.caffe_pb2.Datum()
            datum.channels = images[i].shape[2]
            datum.height = images[i].shape[0]
            datum.width = images[i].shape[1]

            assert images[i].dtype == numpy.uint8 or images[i].dtype == numpy.float, "currently only numpy.uint8 and numpy.float images are supported"

            if images[i].dtype == numpy.uint8:
                # For NumPy 1.9 or higher, use tobytes() instead!
                datum.data = images[i].transpose(2, 0, 1).tostring()
            else:
                datum.float_data.extend(images[i].transpose(2, 0, 1).flat)

            if len(labels) > 0:
                datum.label = labels[i]

            key = to_key(self._write_pointer)
            keys.append(key)

            transaction.put(key.encode('ascii'), datum.SerializeToString());
            self._write_pointer += 1

    return keys
The shown method is provided in caffe-tools and can be used as follows:
import tools.lmdb_io # LMDB I/O tools in caffe-tools

lmdb_path = 'tests/test_lmdb'
lmdb = tools.lmdb_io.LMDB(lmdb_path)

# Some random images in uint8:
write_images = [(numpy.random.rand(10, 10, 3)*255).astype(numpy.uint8)]*10
write_labels = [0]*10

lmdb.write(write_images, write_labels)
read_images, read_labels, read_keys = lmdb.read()
For reading the created LMDB, the following method is used:
def read(self):
        """
        Read the whole LMDB. The method will return the data and labels (if
        applicable) as dictionary which is indexed by the eight-digit numbers
        stored as strings.

        :return: read images, labels and the corresponding keys
        :rtype: ([numpy.ndarray], [int], [string])
        """

        images = []
        labels = []
        keys = []
        env = lmdb.open(self._lmdb_path, readonly = True)

        with env.begin() as transaction:
            cursor = transaction.cursor();

            for key, raw in cursor:
                datum = caffe.proto.caffe_pb2.Datum()
                datum.ParseFromString(raw)

                label = datum.label

                if datum.data:
                    image = numpy.fromstring(datum.data, dtype = numpy.uint8).reshape(datum.channels, datum.height, datum.width).transpose(1, 2, 0)
                else:
                    image = numpy.array(datum.float_data).astype(numpy.float).reshape(datum.channels, datum.height, datum.width).transpose(1, 2, 0)

                images.append(image)
                labels.append(label)
                keys.append(key)

        return images, labels, keys
In both cases, writing and reading, note the difference between unsigned char (8 bit) and float (32 bit) data. Furthermore, both methods assume BGR color space, i.e. as read and used by OpenCV — Caffe also assumes BGR color space. Also note, that for simplicity, the map_size is initially set as 1099511627776, i.e. 1TB, which should be fine for 64bit systems and is also done by Caffe.
Conversion from CSV and Images
In most practical cases, data is available in the form of images or other data formats such as CSV. Therefore, caffe-tools provides some easy-to-use pre-processing tools for data conversion. For example, in examples/iris.py the Iris dataset is converted from CSV to LMDB:
import tools.pre_processing
import tools.lmdb_io

# The below example reads the CSV and writes both the data and the label
# to an LMDB. The data is normalized by the provided maximum value 7.9.
# In order to find and convert the label, its column index and a label mapping
# is provided (i.e. 'Iri-setosa' is mapped to label 0 etc.).
lmdb_converted = args.working_directory + '/lmdb_converted'
pp_in = tools.pre_processing.PreProcessingInputCSV(args.file, delimiter = ',',
                                                   label_column = 4,
                                                   label_column_mapping = {
                                                       'Iris-setosa': 0,
                                                       'Iris-versicolor': 1,
                                                       'Iris-virginica': 2
                                                   })
pp_out_converted = tools.pre_processing.PreProcessingOutputLMDB(lmdb_converted)
pp_convert = tools.pre_processing.PreProcessingNormalize(pp_in, pp, 7.9)
pp_convert.run()

print('LMDB:')
lmdb = tools.lmdb_io.LMDB(lmdb_converted)
images, labels, keys = lmdb.read()

for n in range(len(images)):
    print images[n].reshape((4)), labels[n]
Additional examples can be found in examples/bsds500.py.
Data Augmentation
Data augmentation is a recurrent scheme in deep learning in order to automatically learn invariances, robustness to noise or artifically increase the dataset size (see e.g. [2] for some commonly used techniques). Data augmentation is best done on-the-fly in a custom data layer, see Section Custom Python Layers. To this end, some common data augmentation techniques are provided in tools.data_augmentation. While not all of them are implemented yet, they illustrate the notion of data augmentation. Some examples are:
def multiplicative_gaussian_noise(images, std = 0.05):
    """
    Multiply with Gaussian noise.

    :param images: images (or data) in Caffe format (batch_size, height, width, channels)
    :type images: numpy.ndarray
    :param std: standard deviation of Gaussian
    :type std: float
    :return: images (or data) with multiplicative Gaussian noise
    :rtype: numpy.ndarray
    """

    assert images.ndim == 4
    assert images.dtype == numpy.float32

    return numpy.multiply(images, numpy.random.randn(images.shape[0], images.shape[1], images.shape[2], images.shape[3])*std + 1)

def additive_gaussian_noise(images, std = 0.05):
    """
    Add Gaussian noise to the images.

    :param images: images (or data) in Caffe format (batch_size, height, width, channels)
    :type images: numpy.ndarray
    :param std: standard deviation of Gaussian
    :type std: float
    :return: images (or data) with additive Gaussian noise
    :rtype: numpy.ndarray
    """

    assert images.ndim == 4
    assert images.dtype == numpy.float32

    return images + numpy.random.randn(images.shape[0], images.shape[1], images.shape[2], images.shape[3])*std
Note that, as these data augmentations should be applied on-the-fly, after pre-processing the data, they usually assume the data to be scaled to $[0,1]$ (and mean subtracted if applicable). This is necessary in order for the default values, e.g. for std, to work.
Network Definition
While most of the examples found on the internet are provided in the form of .prototxt definitions (e.g. in the Model Zoo), pyCaffe allows to define network architectures programmatically. Two examples are provided below:
def iris_network(lmdb_path, batch_size):
    """
    Simple network for Iris classification.

    :param lmdb_path: path to LMDB to use (train or test LMDB)
    :type lmdb_path: string
    :param batch_size: batch size to use
    :type batch_size: int
    :return: the network definition as string to write to the prototxt file
    :rtype: string
    """

    net = caffe.NetSpec()
    net.data, net.labels = caffe.layers.Data(batch_size = batch_size, backend = caffe.params.Data.LMDB,
                                             source = lmdb_path, ntop = 2)
    net.data_aug = caffe.layers.Python(net.data,
                                       python_param = dict(module = 'tools.layers', layer = 'DataAugmentationRandomMultiplicativeNoiseLayer'))
    net.labels_aug = caffe.layers.Python(net.labels,
                                         python_param = dict(module = 'tools.layers', layer = 'DataAugmentationDuplicateLabelsLayer'))
    net.fc1 = caffe.layers.InnerProduct(net.data_aug, num_output = 12,
                                        bias_filler = dict(type = 'xavier', std = 0.1),
                                        weight_filler = dict(type = 'xavier', std = 0.1))
    net.sigmoid1 = caffe.layers.Sigmoid(net.fc1)
    net.fc2 = caffe.layers.InnerProduct(net.sigmoid1, num_output = 3,
                                        bias_filler = dict(type = 'xavier', std = 0.1),
                                        weight_filler = dict(type = 'xavier', std = 0.1))
    net.score = caffe.layers.Softmax(net.fc2)
    net.loss = caffe.layers.MultinomialLogisticLoss(net.score, net.labels_aug)

    return net.to_proto()
def mnist_network(lmdb_path, batch_size):
    """
    Convolutional network for MNIST classification.

    :param lmdb_path: path to LMDB to use (train or test LMDB)
    :type lmdb_path: string
    :param batch_size: batch size to use
    :type batch_size: int
    :return: the network definition as string to write to the prototxt file
    :rtype: string
    """

    net = caffe.NetSpec()

    net.data, net.labels = caffe.layers.Data(batch_size = batch_size,
                                             backend = caffe.params.Data.LMDB,
                                             source = lmdb_path,
                                             transform_param = dict(scale = 1./255),
                                             ntop = 2)
    net.augmented_data = caffe.layers.Python(net.data, python_param = dict(module = 'tools.layers', layer = 'DataAugmentationMultiplicativeGaussianNoiseLayer'))
    net.augmented_labels = caffe.layers.Python(net.labels, python_param = dict(module = 'tools.layers', layer = 'DataAugmentationDoubleLabelsLayer'))

    net.conv1 = caffe.layers.Convolution(net.augmented_data, kernel_size = 5, num_output = 20,
                                         weight_filler = dict(type = 'xavier'))
    net.pool1 = caffe.layers.Pooling(net.conv1, kernel_size = 2, stride = 2,
                                     pool = caffe.params.Pooling.MAX)
    net.conv2 = caffe.layers.Convolution(net.pool1, kernel_size = 5, num_output = 50,
                                         weight_filler = dict(type = 'xavier'))
    net.pool2 = caffe.layers.Pooling(net.conv2, kernel_size = 2, stride = 2,
                                     pool = caffe.params.Pooling.MAX)
    net.fc1 =   caffe.layers.InnerProduct(net.pool2, num_output = 500,
                                          weight_filler = dict(type = 'xavier'))
    net.relu1 = caffe.layers.ReLU(net.fc1, in_place = True)
    net.score = caffe.layers.InnerProduct(net.relu1, num_output = 10,
                                          weight_filler = dict(type = 'xavier'))
    net.loss =  caffe.layers.SoftmaxWithLoss(net.score, net.augmented_labels)

    return net.to_proto()
Note that the second network, i.e. mnist_network, already includes a custom Python layer to illustrate the usage. The network definitions can easily be written to .prototxt files as follows:
# Set train_prototxt_path, train_lmdb_path and train_batch_size accordingly.
# Do the same for the test network below.
with open(train_prototxt_path, 'w') as f:
    f.write(str(iris_network(train_lmdb_path, train_batch_size)))
with open(test_prototxt_path, 'w') as f:
    f.write(str(iris_network(test_lmdb_path, test_batch_size)))
Although these examples do not include all possible layers and their options, the layers and their parameters can be found in caffe.proto and the parameter names generalize to pyCaffe in a straight-forward way. As example, the pooling parameters are shown below:
message PoolingParameter {
  enum PoolMethod {
    MAX = 0;
    AVE = 1;
    STOCHASTIC = 2;
  }
  optional PoolMethod pool = 1 [default = MAX]; // The pooling method
  // Pad, kernel size, and stride are all given as a single value for equal
  // dimensions in height and width or as Y, X pairs.
  optional uint32 pad = 4 [default = 0]; // The padding size (equal in Y, X)
  optional uint32 pad_h = 9 [default = 0]; // The padding height
  optional uint32 pad_w = 10 [default = 0]; // The padding width
  optional uint32 kernel_size = 2; // The kernel size (square)
  optional uint32 kernel_h = 5; // The kernel height
  optional uint32 kernel_w = 6; // The kernel width
  optional uint32 stride = 3 [default = 1]; // The stride (equal in Y, X)
  optional uint32 stride_h = 7; // The stride height
  optional uint32 stride_w = 8; // The stride width
  enum Engine {
    DEFAULT = 0;
    CAFFE = 1;
    CUDNN = 2;
  }
  optional Engine engine = 11 [default = DEFAULT];
  // If global_pooling then it will pool over the size of the bottom by doing
  // kernel_h = bottom->height and kernel_w = bottom->width
  optional bool global_pooling = 12 [default = false];
}
As can be seen, the option names (e.g. pool, stride, pad) are the same in pyCaffe. Constants such as PoolMethod are found in caffe.params.Pooling. and equivalently for the other layers.
Custom Python Layers
As illustrated above, pyCaffe allows to define custom Python layers. Before giving a few examples, two things should be clear: First, pyCaffe needs to be compiled using the WITH_PYTHON_LAYER=1 option; second, when defining custom Python layers involving back propagation, the .prototxt definition needs to include force_backward: true. This can easily be done as follows:
with open(train_prototxt_path, 'w') as f:
    f.write('force_backward: true\n') # For the MNIST network it is not necessary, but for illustration purposes ...
    f.write(str(mnist_network(train_lmdb_path, train_batch_size)))
Custom layers, follow a simple scheme as illustrated in the TestLayer below:
class TestLayer(caffe.Layer):
    """
    A test layer meant for testing purposes which actually does nothing.
    Note, however, to use the force_backward: true option in the net specification
    to enable the backward pass in layers without parameters.
    """

    def setup(self, bottom, top):
        """
        Checks the correct number of bottom inputs.

        :param bottom: bottom inputs
        :type bottom: [numpy.ndarray]
        :param top: top outputs
        :type top: [numpy.ndarray]
        """

        pass

    def reshape(self, bottom, top):
        """
        Make sure all involved blobs have the right dimension.

        :param bottom: bottom inputs
        :type bottom: caffe._caffe.RawBlobVec
        :param top: top outputs
        :type top: caffe._caffe.RawBlobVec
        """

        top[0].reshape(bottom[0].data.shape[0], bottom[0].data.shape[1], bottom[0].data.shape[2], bottom[0].data.shape[3])

    def forward(self, bottom, top):
        """
        Forward propagation.

        :param bottom: bottom inputs
        :type bottom: caffe._caffe.RawBlobVec
        :param top: top outputs
        :type top: caffe._caffe.RawBlobVec
        """

        top[0].data[...] = bottom[0].data

    def backward(self, top, propagate_down, bottom):
        """
        Backward pass.

        :param bottom: bottom inputs
        :type bottom: caffe._caffe.RawBlobVec
        :param propagate_down:
        :type propagate_down:
        :param top: top outputs
        :type top: caffe._caffe.RawBlobVec
        """

        bottom[0].diff[...] = top[0].diff[...]
While TestLayer isn't very spectacular, it illustrates the required components when implementing custom Python layers: setup, reshape, forward and backward. The setup method is usually used to check the correct number of in- and outputs and setup the parameters if applicable (see here for a layer with parameters). The reshape method reshapes the output blobs according to the computations performed in forward. In the following, two useful layers are discussed to give some more details.
The Manhatten loss layer mirrors the commonly used Euclidean loss layer and is particular useful for illustrating the forward and backward pass:
class ManhattenLoss(caffe.Layer):
    """
    Compute the Manhatten Loss.
    """

    def setup(self, bottom, top):
        """
        Checks the correct number of bottom inputs.

        :param bottom: bottom inputs
        :type bottom: [numpy.ndarray]
        :param top: top outputs
        :type top: [numpy.ndarray]
        """

        if len(bottom) != 2:
            raise Exception('Need two bottom inputs for Manhatten distance.')

    def reshape(self, bottom, top):
        """
        Make sure all involved blobs have the right dimension.

        :param bottom: bottom inputs
        :type bottom: caffe._caffe.RawBlobVec
        :param top: top outputs
        :type top: caffe._caffe.RawBlobVec
        """

        # Check bottom dimensions.
        if bottom[0].count != bottom[1].count:
            raise Exception('Inputs of both bottom inputs have to match.')

        # Set shape of diff to input shape.
        self.diff = numpy.zeros_like(bottom[0].data, dtype = numpy.float32)

        # Set output dimensions:
        top[0].reshape(1)

    def forward(self, bottom, top):
        """
        Forward propagation, i.e. compute the Manhatten loss.

        :param bottom: bottom inputs
        :type bottom: caffe._caffe.RawBlobVec
        :param top: top outputs
        :type top: caffe._caffe.RawBlobVec
        """

        scores = bottom[0].data # network output
        labels = bottom[1].data.reshape(scores.shape) # labels

        self.diff[...] = (-1)*(scores < labels).astype(int) \
                + (scores > labels).astype(int)

        top[0].data[0] = numpy.sum(numpy.abs(scores - labels)) / bottom[0].num

    def backward(self, top, propagate_down, bottom):
        """
        Backward pass.

        :param bottom: bottom inputs
        :type bottom: caffe._caffe.RawBlobVec
        :param propagate_down:
        :type propagate_down:
        :param top: top outputs
        :type top: caffe._caffe.RawBlobVec
        """

        for i in range(2):
            if not propagate_down[i]:
                continue

            if i == 0:
                sign = 1
            else:
                sign = -1

            # also see the comments of this article for the discussion why top[0].diff[0] is used:
            bottom[i].diff[...] = (sign * self.diff * top[0].diff[0] / bottom[i].num).reshape(bottom[i].diff.shape)
Defining custom Python layers becomes most useful for defining custom data layers. This may involve using different data sources, but usually involves some sort of on-the-fly pre-processing, reshaping or data augmentation. The following two layers perform data augmentation on the input data and the corresponding labels.
class DataAugmentationDoubleLabelsLayer(caffe.Layer):
    """
    All data augmentation labels double or quadruple the number of samples per
    batch. This layer is the base layer to double or quadruple the
    labels accordingly.
    """

    def setup(self, bottom, top):
        """
        Checks the correct number of bottom inputs.

        :param bottom: bottom inputs
        :type bottom: [numpy.ndarray]
        :param top: top outputs
        :type top: [numpy.ndarray]
        """

        self._k = 2

    def reshape(self, bottom, top):
        """
        Make sure all involved blobs have the right dimension.

        :param bottom: bottom inputs
        :type bottom: caffe._caffe.RawBlobVec
        :param top: top outputs
        :type top: caffe._caffe.RawBlobVec
        """

        if len(bottom[0].shape) == 4:
            top[0].reshape(self._k*bottom[0].data.shape[0], bottom[0].data.shape[1], bottom[0].data.shape[2], bottom[0].data.shape[3])
        elif len(bottom[0].shape) == 3:
            top[0].reshape(self._k*bottom[0].data.shape[0], bottom[0].data.shape[1], bottom[0].data.shape[2])
        elif len(bottom[0].shape) == 2:
            top[0].reshape(self._k*bottom[0].data.shape[0], bottom[0].data.shape[1])
        else:
            top[0].reshape(self._k*bottom[0].data.shape[0])

    def forward(self, bottom, top):
        """
        Forward propagation.

        :param bottom: bottom inputs
        :type bottom: caffe._caffe.RawBlobVec
        :param top: top outputs
        :type top: caffe._caffe.RawBlobVec
        """

        batch_size = bottom[0].data.shape[0]
        if len(bottom[0].shape) == 4:
            top[0].data[0:batch_size, :, :, :] = bottom[0].data

            for i in range(self._k - 1):
                top[0].data[(i + 1)*batch_size:(i + 2)*batch_size, :, :, :] = bottom[0].data
        elif len(bottom[0].shape) == 3:
            top[0].data[0:batch_size, :, :] = bottom[0].data

            for i in range(self._k - 1):
                top[0].data[(i + 1)*batch_size:(i + 2)*batch_size, :, :] = bottom[0].data
        elif len(bottom[0].shape) == 2:
            top[0].data[0:batch_size, :] = bottom[0].data

            for i in range(self._k - 1):
                top[0].data[(i + 1)*batch_size:(i + 2)*batch_size, :] = bottom[0].data
        else:
            top[0].data[0:batch_size] = bottom[0].data

            for i in range(self._k - 1):
                top[0].data[(i + 1)*batch_size:(i + 2)*batch_size] = bottom[0].data

    def backward(self, top, propagate_down, bottom):
        """
        Backward pass.

        :param bottom: bottom inputs
        :type bottom: caffe._caffe.RawBlobVec
        :param propagate_down:
        :type propagate_down:
        :param top: top outputs
        :type top: caffe._caffe.RawBlobVec
        """

        pass
class DataAugmentationMultiplicativeGaussianNoiseLayer(caffe.Layer):
    """
    Multiplicative Gaussian noise.
    """

    def setup(self, bottom, top):
        """
        Checks the correct number of bottom inputs.

        :param bottom: bottom inputs
        :type bottom: [numpy.ndarray]
        :param top: top outputs
        :type top: [numpy.ndarray]
        """

        pass

    def reshape(self, bottom, top):
        """
        Make sure all involved blobs have the right dimension.

        :param bottom: bottom inputs
        :type bottom: caffe._caffe.RawBlobVec
        :param top: top outputs
        :type top: caffe._caffe.RawBlobVec
        """

        top[0].reshape(2*bottom[0].data.shape[0], bottom[0].data.shape[1], bottom[0].data.shape[2], bottom[0].data.shape[3])

    def forward(self, bottom, top):
        """
        Forward propagation.

        :param bottom: bottom inputs
        :type bottom: caffe._caffe.RawBlobVec
        :param top: top outputs
        :type top: caffe._caffe.RawBlobVec
        """

        batch_size = bottom[0].data.shape[0]
        top[0].data[0:batch_size, :, :, :] = bottom[0].data
        top[0].data[batch_size:2*batch_size, :, :, :] = tools.data_augmentation.multiplicative_gaussian_noise(bottom[0].data)

    def backward(self, top, propagate_down, bottom):
        """
        Backward pass.

        :param bottom: bottom inputs
        :type bottom: caffe._caffe.RawBlobVec
        :param propagate_down:
        :type propagate_down:
        :param top: top outputs
        :type top: caffe._caffe.RawBlobVec
        """

        pass
class DataAugmentationAdditiveGaussianNoiseLayer(caffe.Layer):
    """
    Additive Gaussian noise.
    """

    def setup(self, bottom, top):
        """
        Checks the correct number of bottom inputs.

        :param bottom: bottom inputs
        :type bottom: [numpy.ndarray]
        :param top: top outputs
        :type top: [numpy.ndarray]
        """

        pass

    def reshape(self, bottom, top):
        """
        Make sure all involved blobs have the right dimension.

        :param bottom: bottom inputs
        :type bottom: caffe._caffe.RawBlobVec
        :param top: top outputs
        :type top: caffe._caffe.RawBlobVec
        """

        top[0].reshape(2*bottom[0].data.shape[0], bottom[0].data.shape[1], bottom[0].data.shape[2], bottom[0].data.shape[3])

    def forward(self, bottom, top):
        """
        Forward propagation.

        :param bottom: bottom inputs
        :type bottom: caffe._caffe.RawBlobVec
        :param top: top outputs
        :type top: caffe._caffe.RawBlobVec
        """

        batch_size = bottom[0].data.shape[0]
        top[0].data[0:batch_size, :, :, :] = bottom[0].data
        top[0].data[batch_size:2*batch_size, :, :, :] = tools.data_augmentation.additive_gaussian_noise(bottom[0].data)

    def backward(self, top, propagate_down, bottom):
        """
        Backward pass.

        :param bottom: bottom inputs
        :type bottom: caffe._caffe.RawBlobVec
        :param propagate_down:
        :type propagate_down:
        :param top: top outputs
        :type top: caffe._caffe.RawBlobVec
        """

        pass
Both layers are used as illustrated in mnist_network.
Deploying Networks
Moving from the training/testing .prototxt definitions to a deployed network involves two steps:
- Eliminating the LMDB input layer;
- and removing the loss layer.
An example of this transformation is illustrated below:
layer {
  name: "data"
  type: "Data"
  top: "data"
  top: "label"
  transform_param {
    scale: 0.00390625
  }
  data_param {
    source: "train_lmdb"
    batch_size: 128
    backend: LMDB
  }
}
# ...
layer {
  name: "loss"
  type: "SoftmaxWithLoss"
  bottom: "fc8"
  bottom: "label"
  top: "loss"
}
layer {
  name: "data"
  type: "Input"
  top: "data"
  input_param { shape: { dim: 128 dim: 1 dim: 28 dim: 28 } }
}
# ...
This transformation can be automated by tools.prototxt.train2deploy.
Training
Training can, of course, be done using the tools shipped with Caffe. However, in order to get some more control and also monitor training progress, tools.solvers provides a simple wrapper around the Caffe-provided solvers (e.g. caffe.SGDSolver). This wrapper basically steps through the solver as follows:
# Assuming that the solver .prototxt has already been configured including
# the corresponding training and testing network definitions (as .prototxt).
solver = caffe.SGDSolver(prototxt_solver)

iterations = 1000 # Depending on dataset size, batch size etc. ...
for iteration in range(iterations):
    solver.step(1) # We could also do larger steps (i.e. multiple iterations at once).

    # Here we could monitor the progress by testing occasionally,
    # plotting loss, error, gradients, activations etc.
tools.solvers.MonitoringSolver does exactly that while allowing to register callbacks automatically invoked in certain iterations. Details are discussed below. First, we want to programmatically generate the required solver .prototxt file.
Solver Configuration
Similar to the network definitions, the solver configuration is stored in a .prototxt file. Unfortunately, pyCaffe does not allow to programmatically generate this file. tools.solvers provides reading and writing capabilities in order to set solver configuration options in the form of Python dictionaries:
solver_prototxt_path = 'solver.prototxt'
solver_prototxt = tools.solvers.SolverProtoTXT({
    'train_net': train_prototxt_path,
    'test_net': test_prototxt_path,
    'test_initialization': 'false', # no testing
    'test_iter': 0, # no testing
    'test_interval': 1000,
    'base_lr': 0.01,
    'lr_policy': 'inv',
    'gamma': 0.0001,
    'power': 0.75,
    'stepsize': 1000,
    'display': 100,
    'max_iter': 1000,
    'momentum': 0.95,
    'weight_decay': 0.0005,
    'snapshot': 0, # only at the end
    'snapshot_prefix': args.working_directory + '/snapshot',
    'solver_mode': 'CPU'
})

solver_prototxt.write(solver_prototxt_path)
solver = caffe.SGDSolver(solver_prototxt_path)
# ...
del solver_prototxt
# ...
solver_prototxt = tools.solvers.SolverProtoTXT()
solver_prototxt.read(solver_prototxt_path)
print solver_prototxt
Monitoring
For monitoring the training process, it is beneficial to plot (among others) the training loss and the training as well as testing error. To this end, tools.solvers.MonitoringSolver allows to register callbacks as follows:
def count_errors(scores, labels):
    """
    Utility method to count the errors given the ouput of the
    "score" layer and the labels.

    :param score: output of score layer
    :type score: numpy.ndarray
    :param labels: labels
    :type labels: numpy.ndarray
    :return: count of errors
    :rtype: int
    """

    return numpy.sum(numpy.argmax(scores, axis = 1) != labels)

solver = caffe.SGDSolver(prototxt_solver)
callbacks = []

# Callback to report loss in console. Also automatically plots the loss
# and writes it to the given file. In order to silence the console,
# use plot_loss instead of report_loss.
report_loss = tools.solvers.PlotLossCallback(100, '/loss.png') # How often to report the loss and where to plot it
callbacks.append({
    'callback': tools.solvers.PlotLossCallback.report_loss,
    'object': report_loss,
    'interval': 1,
})

# Callback to report error in console.
# Needs to know the training set size and testing set size and
# is provided with a function count_errors to count (or calculate) the errors
# given the labels and the network output
report_error = tools.solvers.PlotErrorCallback(count_errors, training_set_size, testing_set_size,
                                               '', # may be used for saving early stopping models, uninteresting here ...
                                               'error.png') # where to plot the error
callbacks.append({
    'callback': tools.solvers.PlotErrorCallback.report_error,
    'object': report_error,
    'interval': 500,
})

# Callback for saving regular snapshots using the snapshot_prefix in the
# solver prototxt file.
callbacks.append({
    'callback': tools.solvers.SnapshotCallback.write_snapshot,
    'object': tools.solvers.SnapshotCallback(),
    'interval': 500,
})

monitoring_solver = tools.solvers.MonitoringSolver(solver)
monitoring_solver.register_callback(callbacks)
monitoring_solver.solve(args.iterations)
More examples are provided in examples/. Example plots are shown in Figure 1. The loss is computed every iteration (as the interval is 1) but only reported in the console every 100 iterations. The error is only calculated every 500 iterations.
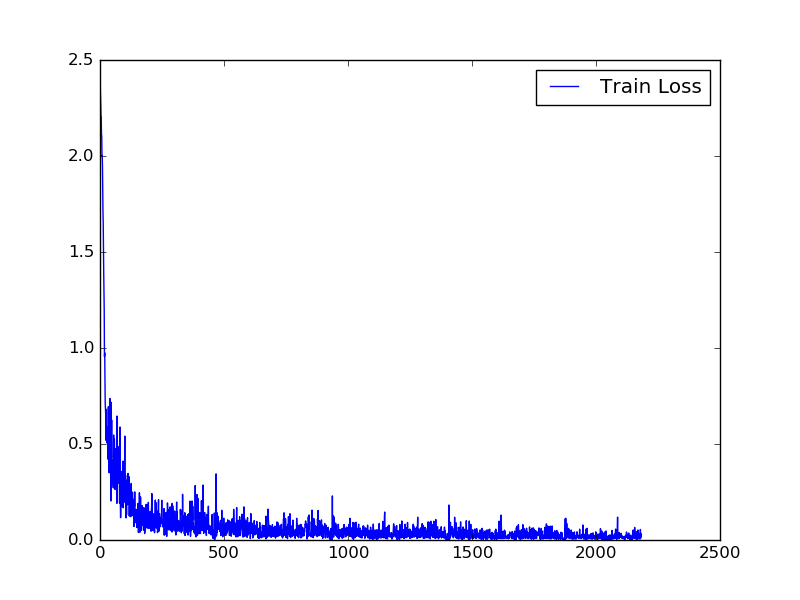
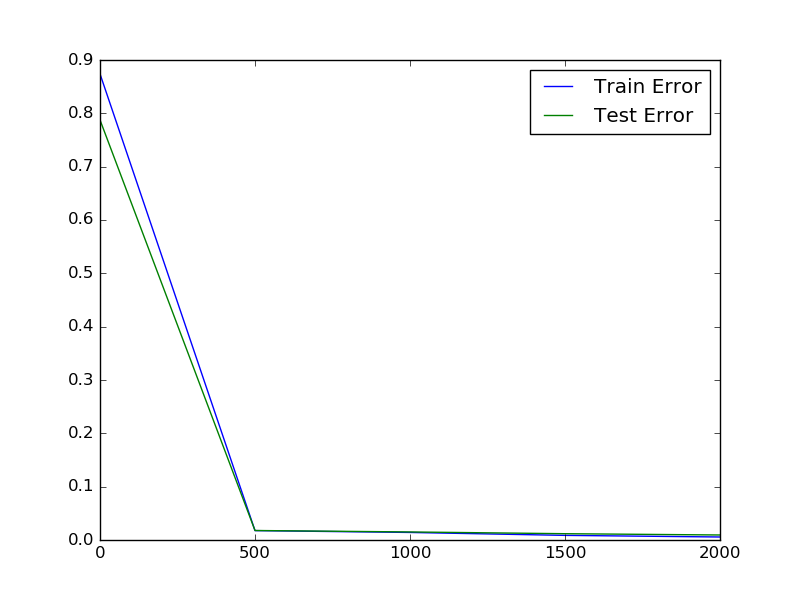

Figure 1 (click to enlarge): Training loss (left), training and testing error (middle) and layer gradients (right) when training a convolutional neural network on MNIST, see examples/mnist.py for details. Training loss and layer gradients are reported every iteration, training and testing error only every 500 iterations.
In general, custom callbacks can easily be added by implementing the following class definition. The callback is provided with the iteration number and the Caffe solver each time it is involved. Through the solver, the callback can access the training network and the testing networks:
class SomethingCallback:
    """
    Simple callback for reporting something ...
    """

    def report_something(self, iteration, solver):
        """
        Report the gradient for all layers.

        :param iteration: current iteration (may deviate from solver iteration)
        :type iteration: int
        :param solver: solver
        :type solver: caffe.Solver
        """

        # solver.net is the training net, solver.test_nets[0] the first test net
        # and so on ...
        pass

# ...
callbacks.append({
    'callback': SomethingCallback.report_something,
    'object': SomethingCallback(),
    'interval': 500, # invoke every 500 iterations ...
})
Additional information (not provided by the Caffe solver) could be provided through a constructor.
Testing
For testing, two prerequisites need to be fulfilled: First, a caffemodel created during training needs to be available; and second, a matching deploy .prototxt definition is required. Both prerequisites are fulfilled when writing regular snapshots during training and using tools.prototxt.train2deploy on the generated .prototxt network definitions (or editing the .prototxt definitions manually as described in Deploying Networks). Then, the network can be initialized as follows:
net = caffe.Net(deploy_prototxt_path, caffemodel_path, caffe.TEST)
The input data can then be set by reshaping the data blob:
image = cv2.imread(image_path)
net.blobs['data'].reshape(1, image.shape[2], image.shape[0], image.shape[1])
The data can now be written to the data blob, however, first the image needs to be transformed as also done during training. This involves reshaping the image to (1, C, H, W) and may also involve normalization and mean subtraction.
Transformer
For pre-processing the input image appropriately, pyCaffe provides a transformer. For example, when only normalizing the data to $[0,1]$, this may look as follows:
transformer = caffe.io.Transformer({'data': (1, image.shape[2], image.shape[0], image.shape[1])})
transformer.set_transpose('data', (2, 0, 1)) # To reshape from (H, W, C) to (C, H, W) ...
transformer.set_raw_scale('data', 1/255.) # To scale to [0, 1] ...
net.blobs['data'].data[...] = transformer.preprocess('data', image)
Now, a simple forward pass computes the prediction:
net.forward()
scores = net.blobs['score'].data
Visualization
Visualizing networks is essential to understand their inner workings. While the visualization technique may depend on the network architecture and task (e.g. visualizing feature maps before/after non-linearities or batch normalization; visualizing the scores over individual classes; visualizing the learned kernels and filters etc.), the following examples illustrate how to visualize the learned weights:
def visualize_kernels(net, layer, zoom = 5):
    """
    Visualize kernels in the given convolutional layer.

    :param net: caffe network
    :type net: caffe.Net
    :param layer: layer name
    :type layer: string
    :param zoom: the number of pixels (in width and height) per kernel weight
    :type zoom: int
    :return: image visualizing the kernels in a grid
    :rtype: numpy.ndarray
    """

    num_kernels = net.params[layer][0].data.shape[0]
    num_channels = net.params[layer][0].data.shape[1]
    kernel_height = net.params[layer][0].data.shape[2]
    kernel_width = net.params[layer][0].data.shape[3]

    image = numpy.zeros((num_kernels*zoom*kernel_height, num_channels*zoom*kernel_width))
    for k in range(num_kernels):
        for c in range(num_channels):
            kernel = net.params[layer][0].data[k, c, :, :]
            kernel = cv2.resize(kernel, (zoom*kernel_height, zoom*kernel_width), kernel, 0, 0, cv2.INTER_NEAREST)
            kernel = (kernel - numpy.min(kernel))/(numpy.max(kernel) - numpy.min(kernel))
            image[k*zoom*kernel_height:(k + 1)*zoom*kernel_height, c*zoom*kernel_width:(c + 1)*zoom*kernel_width] = kernel

    return image
For example, for the AlexNet [2], the kernels in the first layer look as in Figure 2.
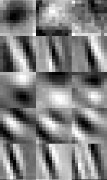
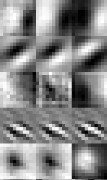
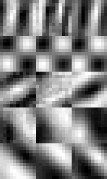
Figure 2 (click to enlarge): Visualized filters of the first convolutional layers of the AlexNet [2] model shipped with Caffe. The three channels per filter are shown in grayscale beneath each other.
Miscellaneous
Some useful snippets that do not fit the other sections.
Get Layer Names
To loop over the layer of a network, it is always useful to get the layer names:
def get_layers(net):
    """
    Get the layer names of the network.

    :param net: caffe network
    :type net: caffe.Net
    :return: layer names
    :rtype: [string]
    """

    return [layer for layer in net.params.keys()]
Copy Weights
In order to copy the weights manually between two identical networks, use:
def copy_weights(net_from, net_to):
    """
    Copy weights between networks.

    :param net_from: network to copy weights from
    :type net_from: caffe.Net
    :param net_to: network to copy weights to
    :type net_to: caffe.Net
    """

    # http://stackoverflow.com/questions/38511503/how-to-compute-test-validation-loss-in-pycaffe
    params = net_from.params.keys()
    for pr in params:
        net_to.params[pr][1] = net_from.params[pr][1]
        net_to.params[pr][0] = net_from.params[pr][0]
This method can simply be extended to only copy specific layers and is, thus, quite useful for fine-tuning networks.
Create a Snapshot
To create a snapshot:
solver.snapshot()
Get Batch Size
To get the batch size:
def get_batch_size(net):
    """
    Get the batch size used in the network.

    :param net: network
    :type net: caffe.Net
    """

    return net.blobs['data'].data.shape[0]
Get the Loss
In order to get the loss on the current batch, i.e. after net.forward():
def get_loss(net):
    """
    Gets the loss from the training net.

    :param net: network to get the loss
    :type net: caffe.Net
    """

    return net.blobs['loss'].data
Compute Gradient Magnitude
Compute the gradient magnitude for each layer:
gradients = []
for i in range(len(net.layers)):
    gradients.append(numpy.sum(numpy.multiply(net.layers[i].blobs[0].diff, net.layers[i].blobs[0].diff)) \
        + numpy.sum(numpy.multiply(net.layers[i].blobs[1].diff, net.layers[i].blobs[1].diff)))
Silencing Caffe Logging
In order to silence Caffe's logging output, use:
# To silence Caffe! Must be added before importing Caffe or modules which
# are importing Caffe.
os.environ['GLOG_minloglevel'] = '3'
import caffe
Note that the flag must be set before importing caffe (or any modules which import Caffe themselves).
Resources
The following is a list of useful resources:
- Caffe and Community:
- Installation Guides:
- http://stackoverflow.com/questions/31395729/how-to-enable-multithreading-with-caffe/31396229
- https://github.com/BVLC/caffe/wiki/Install-Caffe-on-EC2-from-scratch-(Ubuntu,-CUDA-7,-cuDNN-3)
- https://github.com/BVLC/caffe/wiki/Ubuntu-16.04-or-15.10-Installation-Guide
- https://gist.github.com/titipata/f0ef48ad2f0ebc07bcb9
- https://github.com/asampat3090/caffe-ubuntu-14.04
- https://github.com/mrgloom/Caffe-snippets
- GitHub Repositories:
- pyCaffe examples
- https://github.com/nitnelave/pycaffe_tutorial
- https://github.com/pulkitag/pycaffe-utils
- https://github.com/DeeperCS/pycaffe-mnist
- https://github.com/swift-n-brutal/pycaffe_utils
- https://github.com/jimgoo/caffe-oxford102
- https://github.com/ruimashita/caffe-train
- https://github.com/roseperrone/video-object-detection
- https://github.com/pecarlat/caffeTools
- https://github.com/donnemartin/data-science-ipython-notebooks
- https://github.com/jay-mahadeokar/pynetbuilder
- https://github.com/adilmoujahid/deeplearning-cats-dogs-tutorial
- https://github.com/Franck-Dernoncourt/caffe_demos
- https://github.com/koosyong/caffestud
- https://github.com/NVIDIA/DIGITS/tree/master/examples/python-layer
- Caffe variants/versions
- https://github.com/kevinlin311tw/caffe-augmentation (on-the-fly data augmentation)
- GitHub Issues:
- https://github.com/BVLC/caffe/issues/3651 (restoring solverstates in pyCaffe)
- https://github.com/BVLC/caffe/issues/1566 (copying weights/fine-tuning in pyCaffe)
- https://github.com/BVLC/caffe/pull/3082 (expose
.snapshotin pyCaffe) - https://github.com/BVLC/caffe/issues/1257 (manually copying weights in pyCaffe)
- https://github.com/BVLC/caffe/issues/1168 (pyCaffe example for reading LMDB)
- https://github.com/BVLC/caffe/issues/462 (pyCaffe example for classifying data)
- https://github.com/BVLC/caffe/issues/2684 (changing the batch size in pyCaffe)
- https://github.com/BVLC/caffe/issues/2116 (handle float data n LMDBs)
- https://github.com/BVLC/caffe/issues/3959 (pyCaffe example for manual SGD)
- https://github.com/BVLC/caffe/issues/4023 (softmax loss layer in Python)
- https://github.com/BVLC/caffe/pull/2944 (Python layer with parameters)
- StackOverflow:
- http://stackoverflow.com/questions/37418370/how-to-write-comments-in-prototxt-files
- http://stackoverflow.com/questions/33905326/caffe-training-without-testing
- http://stackoverflow.com/questions/38348801/caffe-hangs-after-printing-data-label
- http://stackoverflow.com/questions/35529078/how-to-predict-in-pycaffe
- http://stackoverflow.com/questions/35529078/how-to-predict-in-pycaffe/35572495#35572495
- http://stackoverflow.com/questions/37642885/am-i-using-lmdb-incorrectly-it-says-environment-mapsize-limit-reached-after-0-i
- http://stackoverflow.com/questions/31820976/lmdb-increase-map-size
- http://stackoverflow.com/questions/34092606/how-to-get-the-dataset-size-of-a-caffe-net-in-python/34117558
- http://stackoverflow.com/questions/32379878/cheat-sheet-for-caffe-pycaffe
- http://stackoverflow.com/questions/38511503/how-to-compute-test-validation-loss-in-pycaffe
- http://stackoverflow.com/questions/29788075/setting-glog-minloglevel-1-to-prevent-output-in-shell-from-caffe
- http://stackoverflow.com/questions/36108120/shuffle-data-in-lmdb-file
- http://stackoverflow.com/questions/36459266/caffe-python-manual-sgd
- http://stackoverflow.com/questions/34498527/pycaffe-how-to-create-custom-weights-in-a-python-layer
- http://stackoverflow.com/questions/34996075/caffe-data-layer-example-step-by-step
- http://stackoverflow.com/questions/34549743/caffe-how-to-get-the-phase-of-a-python-layer/34588801
- Blogs and Articles:
- http://christopher5106.github.io/deep/learning/2015/09/04/Deep-learning-tutorial-on-Caffe-Technology.html
- http://www.alanzucconi.com/2016/05/25/generating-deep-dreams/#part2
- http://adilmoujahid.com/posts/2016/06/introduction-deep-learning-python-caffe/
- http://research.beenfrog.com/code/2015/12/30/write-read-lmdb-example.html
- http://deepdish.io/2015/04/28/creating-lmdb-in-python/
- http://gcucurull.github.io/caffe/python/deep-learning/2016/06/29/caffe-confusion-matrix/
References
- [1] Y. Jia, E. Shelhamer, J. Donahue, S. Karayev, J. Long, R. Girshick, S. Guadarrama, T. Darrell. Caffe: Convolutional Architecture for Fast Feature Embedding. arXiv preprint arXiv:1408.5093, 2014.
- [2] A. Krizhevsky, I. Sutskever, G. E. Hinton. ImageNet Classification with Deep Convolutional Neural Networks. Advances in Neural Information Processing Systems 25, 2012.